A build that is great at solo pushing and speedfarming. There are three major variations of this build, depending on which Secondary Skill (Lashing Tail Kick, Tempest Rush, or Wave of Light) you want to focus on.
Skills
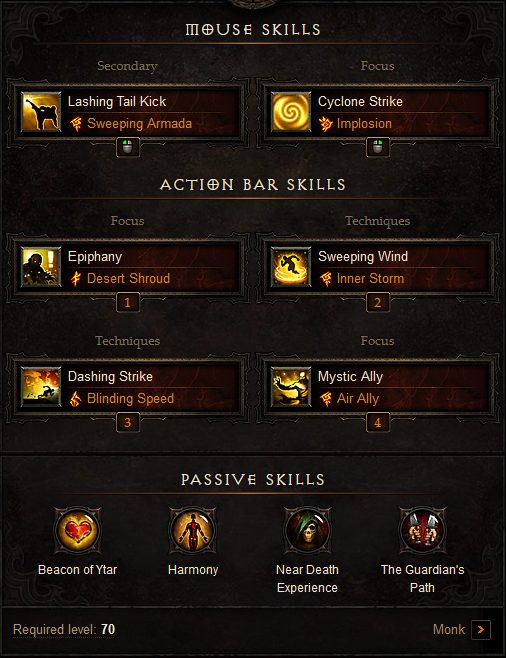
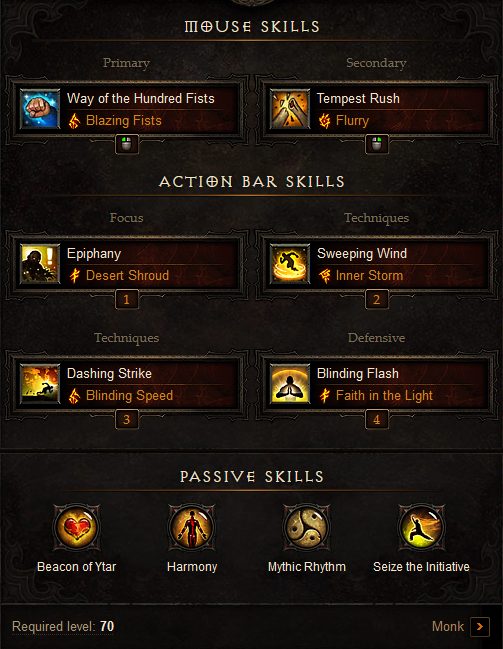
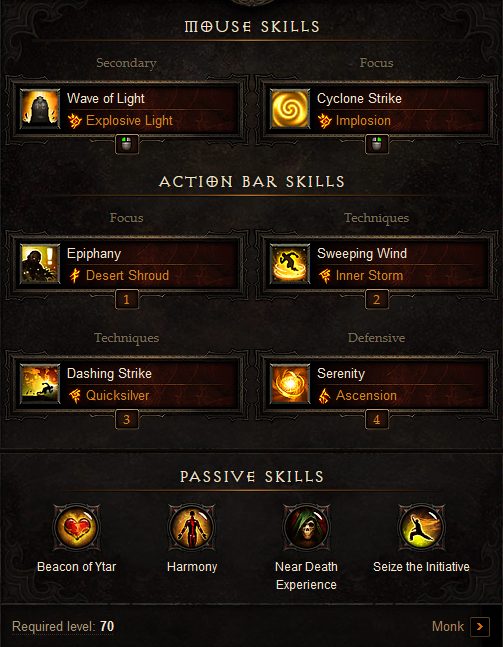
This build will focus around the use of either Lashing Tail Kick, Tempest Rush, or Wave of Light as your primary source of damage. The other major Skill this build focuses on is Sweeping Wind with the Inner Storm Rune, as it will now spawn explosive decoys, give you damage reduction, act as a Spirit generator, and enhance the damage of your chosen Secondary Skill.
Every variation of this build will use Epiphany as well, allowing you to teleport to monsters and giving extra Spirit regeneration. The rest of your Skills will depend on your primary damage dealer:
Lashing Tail Kick
- Mystic Ally – grants more Spirit regeneration with the Air Ally Rune.
- Cyclone Strike – used to pull enemies towards you.
- Dashing Strike – will grant more mobility.
Tempest Rush
- Way of the Hundred Fists – used to proc the Mythic Rhythm Passive.
- Blinding Flash – will be used to enhance your overall damage, as well as the damage of Tempest Rush.
- Dashing Strike, Mantra of Salvation, or Serenity – can be used to either add more mobility or survivability.
- Cyclone Strike – can be equipped to enhance the Cyclone Strikes produced by Won Khim Lau’s effect with a Rune.
Wave of Light
- Cyclone Strike – can be used to pull enemies in (if not equipping Tzo Krin’s Gaze).
- Dashing Strike – for more mobility.
- Mantra of Conviction or Mantra of Salvation – for extra damage or survivability.
- Serenity – can be used for extra survivability.
Passives
- Beacon of Ytar – for extra Cooldown Reduction.
- Harmony and Near Death Experience are both great defensive options.
- Seize the Initiative – gives extra Attack Speed when hitting enemies above 75% health.
- Momentum – another good offensive option.
- The Guardian’s Path – another good defensive option.
Equipment
The primary armor will be the Monkey King’s Garb set. You will need five pieces of it for the full effect (if you Cube the Ring of Royal Grandeur). Vengeful Wind is another essential piece, as it will exponentially enhance both Sweeping Wind and your primary damage dealer. The Captain Crimson’s Trimmings set will increase both survivability and damage. The rest of your equipment will depend on your primary damage dealer.
Lashing Tail Kick
- Scarbringer and Rivera Dancers enhance Lashing Tail Kick.
- The Crudest Boots and Bindings of the Lesser Gods will increase your Mystic Ally’s damage and Spirit regeneration.
- Rabid Strike will increase your damage while using Epiphany.
- Obsidian Ring of the Zodiac will allow you to use your Skills more.
Tempest Rush
- Won Khim Lau, Balance, Mantle of Channeling, and Cesar’s Memento will all increase the damage potential of Tempest Rush.
- Convention of Elements will increase all of your damage.
- Obsidian Ring of the Zodiac will allow you to use your Skills more.
Wave of Light
- Pinto’s Pride, and Incense Torch of the Grand Temple will both enhance Wave of Light.
- Rabid Strike will increase your damage while using Epiphany.
- The Stone of Jordan will increase your damage.
- In-geom will allow you to use your abilities more.
All variations of the build will use Bane of the Trapped and Bane of the Stricken as Legendary Gems, for extra damage. The Tempest Rush variant will use Taeguk for the third, as the Skill can keep its effect up. The other two will use Enforcer to increase both the Mystic Ally’s and Rabid Strike clone’s damage.
Equipment Stat Priorities
Lashing Tail Kick
| Slot | Stat Priorities |
|---|---|
| Weapons | 1. Damage Range 2. Socket (using Ramaladni’s Gift) 3. Cooldown Reduction 4. Area Damage 5. Life per Hit 6. Resource Cost Reduction |
| Helm | 1. Lashing Tail Kick Damage 2. Socket (Flawless Royal Diamond) 3. Critical Hit Chance 4. Dexterity 5. Vitality |
| Gloves | 1. Cooldown Reduction 2. Critical Hit Chance 3. Critical Hit Damage 4. Area Damage |
| Shoulders | 1. Cooldown Reduction 2. Area Damage 3. Dexterity 4. Resource Cost Reduction 5. Vitality |
| Chest | 1. Sockets (3 Flawless Royal Diamonds) 2. Dexterity 3. All Resistance 4. Vitality |
| Pants | 1. Dexterity 2. Sockets (2 Flawless Royal Diamonds) 3. All Resistance 4. Vitality |
| Boots | 1. Lashing Tail Kick Damage 2. Dexterity 3. All Resistance 4. Vitality |
| Rings | 1. Socket 2. Critical Hit Chance 3. Damage Range 4. Critical Hit Damage 5. Cooldown Reduction 6. Area Damage |
| Amulet | 1. Socket 2. Physical Damage 3. Critical Hit Damage 4. Critical Hit Chance |
| Bracers | 1. Physical Damage 2. Critical Hit Chance 3. Dexterity 4. Life per Hit |
| Belt | 1. Dexterity 2. All Resistance 3. Vitality 4. Life % |
Tempest Rush
| Slot | Stat Priorities |
|---|---|
| Weapons | 1. Damage Range 2. Socket (using Ramaladni’s Gift) 3. Resource Cost Reduction 4. Cooldown Reduction 5. Area Damage 6. Life on Hit |
| Helm | 1. Tempest Rush Damage 2. Socket (Flawless Royal Topaz) 3. Critical Hit Chance 4. Dexterity |
| Gloves | 1. Cooldown Reduction 2. Critical Hit Chance 3. Critical Hit Damage 4. Area Damage |
| Shoulders | 1. Cooldown Reduction 2. Resource Cost Reduction 3. Area Damage 4. Dexterity |
| Chest | 1. Sockets (3 Flawless Royal Diamonds) 2. Dexterity 3. Elite Damage Reduction 4. All Resistance |
| Pants | 1. Dexterity 2. Sockets (2 Flawless Royal Diamonds) 3. All Resistance 4. Vitality |
| Boots | 1. Tempest Rush Damage 2. Dexterity 3. All Resistance 4. Vitality |
| Rings | 1. Socket 2. Critical Hit Chance 3. Damage Range 4. Critical Hit Damage 4. Area Damage |
| Amulet | 1. Socket 2. Cold Damage 3. Critical Hit Damage 4. Critical Hit Chance |
| Bracers | 1. Cold Damage 2. Critical Hit Chance 3. Dexterity 4. Life per Hit |
| Belt | 1. Dexterity 2. All Resistance 3. Vitality 4. Life % |
Wave of Light
| Slot | Stat Priorities |
|---|---|
| Weapons | 1. Damage Range 2. Socket (using Ramaladni’s Gift) 3. Cooldown Reduction 4. Attack Speed 5. Damage % |
| Helm | 1. Wave of Light Damage 2. Socket (Flawless Royal Diamond) 3. Critical Hit Chance 4. Dexterity 5. Vitality |
| Gloves | 1. Cooldown Reduction 2. Area Damage 3. Critical Hit Chance 4. Critical Hit Damage |
| Shoulders | 1. Cooldown Reduction 2. Area Damage 3. Dexterity 4. Vitality |
| Chest | 1. Sockets (3 Flawless Royal Emeralds) 2. Dexterity 3. All Resistance 4. Vitality |
| Pants | 1. Dexterity 2. Sockets (2 Flawless Royal Emeralds) 3. All Resistance 4. Vitality |
| Boots | 1. Wave of Light Damage 2. Dexterity 3. All Resistance 4. Vitality |
| Rings | 1. Socket 2. Cooldown Reduction 3. Critical Hit Chance 4. Critical Hit Damage |
| Amulet | 1. Socket 2. Fire Damage 3. Critical Hit Damage 4. Critical Hit Chance |
| Bracers | 1. Fire Damage 2. Critical Hit Chance 3. Dexterity 4. Life per Hit |
| Belt | 1. Dexterity 2. All Resistance 3. Vitality 4. Life % |
Paragon Points
Lashing Tail Kick
| Core | Offensive | Defensive | Utility |
| 1. Movement Speed | 1. Cooldown Reduction | 1. All Resistance | 1. Area Damage |
| 2. Maximum Spirit | 2. Critical Hit Chance | 2. Life % | 2. Resource Cost Reduction |
| 3. Dexterity | 3. Critical Hit Damage | 3. Armor | 3. Pickup Radius |
| 4. Vitality | 4. Attack Speed | 4. Life Regeneration | 4. Life per Hit |
- Prioritize Vitality if you need more survivability.
Tempest Rush
| Core | Offensive | Defensive | Utility |
| 1. Movement Speed | 1. Cooldown Reduction | 1. All Resistance | 1. Area Damage |
| 2. Maximum Spirit | 2. Critical Hit Chance | 2. Life % | 2. Resource Cost Reduction |
| 3. Dexterity | 3. Critical Hit Damage | 3. Armor | 3. Life per Hit |
| 4. Vitality | 4. Attack Speed | 4. Life Regeneration | 4. Pickup Radius |
- Prioritize Vitality if you need more survivability.
Wave of Light
| Core | Offensive | Defensive | Utility |
| 1. Movement Speed | 1. Cooldown Reduction | 1. All Resistance | 1. Area Damage |
| 2. Maximum Spirit | 2. Attack Speed | 2. Life % | 2. Resource Cost Reduction |
| 3. Vitality | 3. Critical Hit Chance | 3. Armor | 3. Pickup Radius |
| 4. Dexterity | 4. Critical Hit Damage | 4. Life Regeneration | 4. Life per Hit |
- Prioritize Vitality if you need more survivability.
Resources and Links
- Lashing Tail Kick

Maxroll
Sunwuko Lashing Tail Kick Monk Guide
Icy Veins
Monk Lashing Tail Kick Build with Monkey King’s Garb
- Tempest Rush
- Wave of Light